In ancient times, the Dwur (dwarf) nations constructed a network of underground "roadways" and canals to facilitate travel without having to expose themselves to the dangers and discomfort of travelling beneath the stars and being away from their beloved rock-homes for too long. This particular waystation, however, is under new management...
Author: Jason Farina
The Waystation
by Jason Farina (Jason.Farina@I-FUSION.NET)
(Used with Permission. Do not repost without obtaining prior permission
from the author.)
[Ed. Note: The author of this encounter reports that this is an unfinished
work. It'll be updated with additional material once its completed.]
Background:
Dwur live underground. That's a given. Dwur have communities, in fact,
they have quite large communities spread over the continent and evidence
(ruins) would point to them having once been more widespread and numerous.
So, multiple communities, distanced from one another, it's not unreasonable
to assume that trade and travel took place. Dwur are masters at carving
and stonework. So why would a dwur travel overland?
The premise for this encounter/location is that the Dwur nations constructed
a network of underground "roadways" and canals to facilitate travel without
having to expose themselves to the dangers and discomfort of travelling
beneath the stars and being away from their beloved rock-homes for too
long. Along these ways would be way stations where a traveller can rest,
restock
or consult a navigator.
A note on Dwur Navigation:
IMC, Dwur navigate using a series of gems and metals to represent a
settlement. For example, Irongate would be represented by, in traditional
dwur efficiency of imagination, Iron. The dwur artisans, miners and priests
formed a network of tunnels to increase travel times, but without many
natural geographic reference points by which to navigate, the tunnels were
designated with a gem or metal type. At it's most basic; to get to Irongate
you would follow the tunnels marked with Iron. Perhaps to get to a settlement
near Irongate you would follow the iron tunnels for a certain number of
intersections and then turn off to some other mineral marker (a bit like
on and off ramps on a highway I suppose). However, few dwur could be expected
to remember all the directions and turnings necessary for every settlement
so a system was needed to keep record of these. A two-stage method was
devised.
First, a large map of the area was created using minerals studded on
a statue of some sort (usually something related to the area like a dragon
or a shield, or a depiction of clangeddin silverbeard). To protect the
locations from enemies, the statues were illegible by themselves. They
had to be read in a specially constructed room with a mirrored ceiling
(domed, flat or otherwise) that reflected the statue and deciphered the
map according to the warps and "bumps" incorporated into the mirror. If
it should seem that the map was in danger, the mirror could be shattered
thus protecting the secret map from prying eyes. A priest of Rodilingar
(my own creation, Dwur God of Navigation and safe journey. A farlanghn
of the underdark perhaps) would have the knowledge of the mirror construction
and warps necessary for an individual statue-map. The priest would live
in the map room and serve as its protector as well as acting as navigator
to those who came to consult the map.
Second, metals would be combined (perhaps in studs, or bands or any
other form) on smaller statues or weapons or shields/armour, the sequence
of which would serve as a portable mini map giving direction to a specific
place. However, the starting point has to be known for the directions to
be useful, usually this would be somewhere personal to the owner of the
item, maybe their birthplace or current home, or even the seat or whatever
clan they are allied with.
This encounter takes place in one such waystation, long since abandoned
during a war with the elves and orcs. It is possible to place this anywhere
you wish and would serve as a good introduction to an underdark campaign
or perhaps a bridge between adventures.
1. The Approach:
A cavern approximately 100ft below ground. The Southern end of the cavern
ends in a chasm running east-west, sheer sided and seemingly bottomless
(up to you). At it's narrowest, the chasm is 40ft and was once spanned
by a stone bridge.
" Almost as if growing from
the rock-floor of the cavern, a ramp constructed of smooth hexagonal flagstones
stretches out over the darkness below stopping just short of the centre.
A mirror of this ramp stretches from the opposite side ending just over
10ft from its twin. Though obviously old, the ramps appear to be quite
solid. The ground on the opposite side of the chasm glimmers with a well-finished
sheen in your torchlight. This worked area sweeps back about 50ft to end
in a seemingly constructed wall."
Examination of the ramp with reveal that while the base of the ramp
is quite solid, the ends are less sturdy. A Dwur PC will recognise the
construction as Dwur origin and may make a stonework check to guesstimate
a 200lb weight limit before risking a collapse. (Let the players
work out for themselves that running and jumping will increase the effective
weight of the jumper,
especially upon landing). The ramps never actually connected. There
was a removable section once that spanned the gap. It was removed before
an orcish raid years ago. The floor on the other side of the chasm is smooth
and quite well finished (a grappling hook will not be easily anchored).
All in the entire gap between the two ramps is 10ft, but anyone jumping
would be well advised to clear about 15ft to avoid risk. {In my campaign,
I used this as a tension builder but didn't allow the ramp to collapse.
Evil DMs can have the ramp collapse after the last pc makes it across,
to give a feeling of "no way out".) PCs with darkvision of over 100ft (or
lowlight vision) can make out the wall opposite, slopes away at the centre
and ends with a large set of doors. A spot check (DC 16) lets them make
out some sort of carving on the doors, and a check result of more than
22 lets them make out what seems to be a rock of some kind in front of
the left hand door.
Once they have made it across the chasm (whatever way they can) they
see that the floor on this side is of finely dressed flagstones set perfectly
flush with one another and merge seamlessly with the equally well-carved
walls. The doors themselves are set 50ft from the ramp and are constructed
of pale granite carved with a Dragon twining around a dwarven hammer (one
on each of the double doors). The doors are quite large, measuring 10ft
in height, 3ft width and 8inches thick. Above the door, carved in raised
letters on the lintel are the words "Give Honour to Moradin" in Dwur, these
are only legible within 10ft as they are quite faded over time. As the
party approaches, it becomes clear that the "rock" is in fact an armoured
corpse lying some 15ft from the left-hand door. His ruined helmet lies
some ten feet further out and the crushed and cracked skull would suggest
that this one did not die of old age. This was one of the orcish invaders
that fell victim to the trap on the doors (and should serve as the first
clue to its existence). It has long since rotted and is now just a skeleton
with skin fragments (now hardened and rocklike from the cold and dust and
damp) clinging to its bones. The armour is in extremely bad repair (it
was bad enough when the orc died, now it's been rotting for a fair while,
and is unusable. Closer examination of the armour will reveal (blacksmithing
or knowledge (history)) that is of a design no longer used - and not used
in many years, also (knowledge: orc society or some relevant skill) will
reveal that the crest crudely painted on the armour and now barely recognisable
as a black hand with red lizard eyes on the fingertips is not of any tribe
known today - researching the symbol is left up to your particular tastes
but might provide an introduction to another adventure or hint at a hidden
band of orcs.
If anyone passes the body, they approach within 10 feet of the doors.
One of the dragon carvings will slowly swing its head out of the door and
gaze silently at whoever is approaching (or both is more than one approaches).
A dwur approaching will cause the head to return to it's carving state
but any other race will set off the trap once within 5ft unless the phrase
"Moradin Accept my honour" in Dwur (Moradin take, or anything close should
be acceptable depending on how evil the dm is).
Trap: variant of 2ed Wyvern Watch, new spell see end. Those approaching
within 10 feet cause the trap to arm. The dragon head swings slowly and
purposefully out from the door to regard the intruder with blank carved
eyes. At 5ft, the dragon mouth slowly and silently opens. (Note, without
a light source or darksight it is possible to walk right up to here without
seeing or hearing anything at all. A nice DM might let the pc "sense" something
moving) Inside 5ft, the dragon strikes requiring a touch attack and bites
the victim for 2d8 points of damage. It then releases and returns to the
door, dormant for 24 hours. Anyone approaching a second time will cause
the other head to activate and expend its charge for the day. A head that
misses goes dormant.
There is no visible lock on the door but they have been constructed
perfectly balanced and expertly fitted so that, even after all these years,
a solid push (DC 7 - unless the player has a minus to strength checks and
is not taking their time assume that it succeeds) will send them swinging
away from the character and revealing a 10ft wide 15ft high corridor, again
carved seamlessly but the floor is decorated with dwur runes speaking the
names of warriors who died defending this place or in battles near here
- the Dm can develop these as he sees fit or rule that the runes are actually
homecoming prayers to Dumathoin or Moradin , beyond that stretches
for approx. 40 ft. before ending in another set of double doors,
carved with hammers. Large iron rings are set at chest height for a dwur
at the centre edge of each door. The doors are locked (a spot roll DC15
will reveal a keyhole concealed in the leather loop of a hammer handle,
and an identical situation of the other door. Both must be picked for the
door to open (open lock DC 22, locks are quite stiff) or the door can be
broken down (hardness 5, 120hp to break). Note: see Grimerik's Last Stand
(below) for side effects of breaking down the doors.
2. The complex central junction:
"This room is octagonal in shape, 10ft on a side. The walls are carved
out of black marble inlaid with a complex design of swirls, spirals and
knotwork interlacing in a bluish metal. The floor is grey flagstones, octagonal
and perfectly smooth. The domed black marble ceiling rises to a height
of almost 25ft directly beneath the apex of which stands a black marble
fountain spilling foul smelling water from a carved dragon head grimy and
water-scaled into an even smellier basin half-filled with a black sludge.
There are three other exits from this room, each an identical doorway leading
to a narrower, downward sloping passage beyond. A cool breeze blows from
the south."
There is nothing magical in this room, or even threatening. The sludge
in the basin is just that, sludge. The decoration around the walls is a
combination of clan knotworks through the ages. A dwur character will not
recognise half of the knots, research and explanation is left up to the
DM (again, possible plot hook? Maybe the knotwork represents relationships
with an intertwining being a marriage.. The PCs could discover that two
feuding families are actually close relations, or that the local king and
queen are first cousins :-), yes! They'd be from West Virginia!!!). There
is nothing of value here, unless you count the black marble. The bluish
metal is steel that has been tinted. It is not magical and almost impossible
to separate from the marble.
3. GellenKund Seat of power:
"This large chamber (15ft high, 30ft east-west, 20 ft north-south) was
once lavishly decorated with banners and tapestries and rugs. Now however,
all lies in tatters and mouldy ruin. The smell of rot and decay fills the
still air. There is a closed door in the southwest. In the centre of the
East wall, fallen and rotted tapestries have been piled nearly 6 foot high!"
There are several dangers here:
1.
The tapestries to the east cover the throne of the GellenKund family along
with the clan symbol, a silver and steel dwarven axe called "BallenCaer"
(see end for details). Anyone rooting through the tapestries has a 30%
chance of finding a quite chewed arm or foot, the tooth marks are broad
and blunt, possibly even human. - Grimerik sometimes comes here when
he wants to eat in private. He crawls under the tapestries and gazes longingly
at BallenCaer, to afraid to take it because of the guardians.
The throne is a large
chair made from some dark wood (deep stained mahogany) and covered with
a deep blue and black tartan. The cushions have been tattered with claw
marks and the legs and arms chewed upon (bite marks match the ones on the
arm/foot bones). The axe is embedded into the back of the throne forming
the central feature of the intricate carving there, and is quite easily
removed... keeping it however is another matter.
Anyone removing the axe awakens
the guardians. These are currently lying underneath the tapestry and if
found while inactive will seem to be nothing more than two suits of spiked
dwur plate mail that has been forged as one solid piece (i.e., joints don't
move or flex rendering the suits unwearable and protecting them from dismantlement.)
If covered with the tapestry, the first anyone knows that they are awake
is a metallic scraping sound followed by the tapestry being shredded and
dragged toward the defiler (or current holder of the axe). They attack
relentlessly unless commanded to stop by a dwur of GellenKund Blood (unlikely,
Grimerik doesn't count anymore as he is no longer technically Dwur).
Danger 2:
The exit from this room
is trapped (crudely but effectively). Still retaining some of his
stone working skills, Grimerik has rigged up a deadfall in front of the
door. Originally it was worse, he had rats in a cavity above the block,
which would fall and had starved them into frenzy. However, he decided
against this plan as a: the rats would eat his victims and b: he didn't
want to spare the food for the rats. As well as damage from the block
the victim now gets showered with rotted rat-bits (20% chance of disease,
fort save DC 18 damage 1d3 Con1d2 Str - temporary, stomach cramps and
lax bowels).
Trap: Block trap: trigger,
opening door (door opens away from player), Spot DC25 (dwur adds wis bonus
for detecting stonework) Disable (DC 25), reflex save negates (DC 21) damage
1d10 and alerts Grimerik.
4. Grim Feast:
"This room is 40ft long north
south and 25ft wide east west. Rotted banners and tapestries adorn the
walls. A large black-oak table dominates the centre of the room. The far
end of the room is occupied by a raised dais on which a small table sits
before a large throne."
If the players bypassed the
trap, avoided too much noise battering down the door to area two and did
not make too much noise fighting the guardians in area 3 read the following:
"Seated around the table
are maybe 20 dwur warriors. Several are feasting on platters of meat while
others are slumped and silent. Nearest you a warrior sits, rotted armour
only slightly better preserved than his cadaver which stares vacantly at
the skeletal feaster opposite. At the far end of the room, a large dwur
dressed in tattered and dented armour sits on the throne calling for unseen
minstrels to stop playing "that maudlin dirge" any play something a little
more "racy" "
If the party has made a lot
of noise:
" Several dwur sized bodies
lie slumped at the table. More however, are standing battle ready. One,
in tattered and dented armour stands on the throne at the back"
What happens next is dependant
on the party make-up and their ability to avoid conflict.
Grimerik: Ghoul Dwur.
History: Grimerik was the
son of Thane GellenKund and as such succeeded him when he failed to return
from a sortie. A coward at heart (unlike his heroic father) Grimerik panicked
when the elves swept toward the navigation post. He ordered the central
span of the bridge thrown down and the doors locked - effectively dooming
any survivors of the sortie that tried to return home. Worse, he shattered
the waypoint mirror despite the Navigator's protests that it was too early
(the navigator later died.. see below :-)). Thinking himself safe he organised
a feast for his men. He was wrong, the elves had secretly poisoned the
water that the well drew from. Grimerik and the majority of his warriors
died but in his stubborn cowardice, Grimerik rose as a ghoul. He proceeded
to feed off and slay those who opposed his decisions, as they lay ill or
dying from the poisoned water. Now he is quite insane. He is still terrified
of an attack from the orcs or elves, indeed a recent party of orcs were
washed down the underground river and managed to get out here. Grimerik
saw this as an enemy scouting party (and a new source of food of course).
He survives now with his skeleton and zombie soldiers, feeding on the remains
of creatures that wander into his lair. However, he still thinks as a dwur
(though he is too afraid to risk touching BallenCaer) and worse, he thinks
as a Dwur at war with elves and orcs. In his mind, the Elves use the Orcs
as shock troops. The humans are unfortunates enslaved by the elves and
not necessarily to be trusted. Gnomes are elven spies. Halflings are ok,
sort of like humans but better at hiding which is why they haven't been
enslaved yet. Needless to say he will be quite confused over the presence
of a dwur in the company of elves/half-orcs/gnomes and humans.
If an elf or half-orc enters
first he will be convinced that this is the invasion he has been dreading
(time has not passed much in his mind). The players will have to think
quickly to avoid a fight. It will be almost impossible to convince Grimerik
that the war is gone and that there is no threat. If the PCs do manage
to talk Grimerik around enough that he trusts them, he will answer questions
willingly. In his mind, the waystation is still in perfect order and the
map is intact. He will even loan a dwur PC the coins he needs to access
the map room if the mention it. Play Grimerik as slimy, cowardly and scatterbrained.
Statistics: Grimerik
Ghoul/fighter 2:
Dwur Skeleton (5);
Dwur Zombie (3);
Treasure:
5. The Boathouse:
" The stairs open out onto
a wide landing that is open on one side. To the north are three large black
wooden structures (if the pcs investigate, they see that they are three
overturned boats in quite bad repair). To the south, two windlasses stand
on either side of a wooden rectangle slightly recessed into the floor.
Large chains run from each windlasses into holes in the floor on
either side of this rectangle. Further to the south, the floor drops sharply
away and the area beyond is swallowed by darkness. Wind whistles around
this room, threatening to carry to their doom any foolish enough to stand
near the edge."
This is, indeed, a boathouse.
The river at the bottom of the ravine to the South was once a much-used
trade route between two dwur settlements (you decide if they are still
around or if they've been lost to ruin or if the way is still navigable).
The boats are in bad repair and each one requires much work before it could
be called river worthy. To mend a boat, without separate materials, one
of the other boats can be picked apart for spares. With the appropriate
skills (profession: boat Wright/carpentry) and a bit of time the job should
be done in maybe 12 or 14 hours.
The windlass and rectangle
to the south are actually a lift and track system to raise and lower boats
and cargo from and to the river hundreds of feet below (220ft actually).
The track is much like that of a mining cart but at an 85-degree angle
down the ravine wall. One windlass can actually be bolted to the wooden
rectangle so that the people on the lift can operate it. After all these
years it is quite stiff (fort save at cumulative -1 modified for strength
as well every 50 ft descent/30ft ascent to avoid fatigue).
Danger:
Anyone making too much noise
runs the risk of attracting the dwellers of area 6. Two adults will investigate
first and will call to the rest if food is in the offering.
Also, if the Dm wills, the
lift can be faulty giving a nice dramatic plunge scene, or a boat can be
not so obviously broken and you can have fun as they hurtle through the
underground rapids bailing furiously.
6. Bridge over the River Quai, or flappy
things ahoy!
"The corridor here ends abruptly
in a sudden drop and open air. If not for the lack of stars you would almost
think yourself outdoors. A cold wind whistles to the south where the floor
restarts ten feet out into the open space."
If the players manage to
get some decent light going they see a rather impressive drop and what
used to be a bridge across it. Unfortunately the sections between pillars
have collapsed leaving islands or a stepping stone effect. The gap between
the pillar portions starts at 8ft but in the centre increases to almost
20ft. Allow the group time to work out a way around this problem, and be
sure to emphasise the possibly huge drop. To the north and West a spot
check (DC24) will show an opening in the ravine wall almost 50 ft below
and 120ft away. A thief or someone with climb skill could travel to there
but too much noise will wake the flappy things.
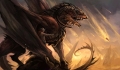
Nested under the third and
seventh pillar are two families of Bladewings (new creature, see below).
They will attack greedily if disturbed. If reduced to ¼ HP or stunned
without solid ground they fall into the darkness below (stunned Bladewings
can glide and so might recover before they hit the river - 3 rounds for
them).
This is an extremely fun
fight! Just be very careful not to kill anyone. It's surprisingly easy
to forget about the height, rope requirement, balance etc and the difficulty
they might have getting healing.
The Bridge itself:
Pillar three:
Bladewings: Adult: 3, young:
5
Pillar 8:
Bladewings: Adult 4, young
2:
7. Room of the navigator:
"Finally the ordeal of the
bridge is over. Standing on the far side of the ravine you are faced by
two towering statues flanking a large metal door. To your left stands a
large dwarven warrior almost twenty feet tall bearing a gleaming battleaxe
and a beard of silver. To the right stands a robed dwur holding a walking
cane made of copper. At the base of each statue is a shallow bowl. The
door is a solid slab of iron with no visible method of opening."
To open the door, the players
must place something silver in the bowl of clangeddin silverbeard and something
copper in the bowl of Rodilingar. Once this is done the objects melt into
the base of the statue and the door lowers down and away from the party,
like a drawbridge. There is no visible method of motion nor can they get
at whatever hinges are set into the floor. The door however stops halfway
down and the PCs are forced to drop the 10 ft from the tip of the door
to the floor of the 20x20
corridor of dark green marble.
The corridor continues for
60 ft due south, the floor littered with desiccated spider bodies and now
rotted shells of egg sacks. As they reach the 60ft mark, players become
aware of a dull red glow from further along the corridor. The light seems
to be striated with dark veins and pulses slightly.
Fight of the Navigator: What
has gone before:
Grimerik shattered the domed
mirror and in doing so took away Navigator Cain's main reason for living.
The futility of Grimerik's action drove the navigator insane and he refused
to leave his not destroyed map-room. Eventually he collapsed from weakness
(Grimerik wasn't feeding him) and while he lay helpless, a strain of spider
burrowed into him and laid its eggs in his heart. As he died he swore to
continue to protect the map room but from everyone, as even his own kinsmen
had shown their complete lack of respect for his deity. Rodilingar, equally
angry at this treatment of his cleric, granted the Navigator his wish and
at the moment of his death, the Navigator was transformed into a guardian
spirit.. Unfortunately, the magic that caused this transformation was unexpectedly
affected by the presence of the spider eggs, resulting in the abomination
that exists now.
The Map Room:
The corridor ends after
60ft, to the right an archway opens into a massive circular chamber, dominated
by a huge white pulsating sac that sheds the scarlet light in throbbing
waves. The sickly light is reflected in a brilliant display from a coating
of glass shards on the floor. Directly beneath the sac is a statue of a
dragon standing on all fours with wings folded at its sides. At the shoulder
it stands almost three feet tall and has a length of almost 8 ft. Points
along the dragon's wings and back gleam and pulse in time with the sac
above.
Hidden from the PC's view
is the Navigator who is seated on his throne on the other side of the sac
on a raised dais. As the PCs enter, he re-occupies his dried and desiccated
corpse and uses it to challenge the intruders in a booming voice. Whatever
the PCs reply he orders them to leave this sacred place and mocks them
as unworthy of the gift of guidance. If the PCs do not leave, the guardian
uses his whirlwind ability to create a swirling maelstrom of mirror shards
around the edge of the circular chamber. Pcs must either move out of the
room or in to the centre to avoid taking damage.
Any PC moving into the centre
can see shapes and shadows moving within the pulsating sac. If a character
comes within 5ft of the sac, on of the pulsing cysts bursts showering the
character in sticky warm and foul smelling fluid (fort save DC 17 or be
paralysed over a period of three rounds) followed two rounds later by several
(1d10) almost translucent spiders that scurry for the, hopefully, now helpless
character and try to burrow into it (these are bloodspiders see end for
details). The sac is highly flammable and if set ablaze pops and spurts
in true Arachnophobia style spilling and spraying fluid and half-formed
spiders (as well as a few (1d20) fully formed ones that escape the blaze).
The fiery mess breaks away from the strands keeping it suspended and flops
to the floor covering the statue (anyone poking through it has a 1 in 10
chance of being attacked by a survivor (treat as a half health spider with
half move and an AC of 11).
Meanwhile, the navigator
itself becomes visible. Rising into the air and suspended on web like strands
made of scarlet mucus the Navigator screams and, if the sac is already
destroyed, uses his gust attack to force the shards out into the corridor
(if anyone is still out there). Anyone in the last 20ft section of corridor
(unless directly in front of the archway) must make a reflex save (DC 17)
or suffer 1d20 + 1d10 - AC points of damage from exploding glass
(half if the reflex save is successful). Those in front of the archway
or in the path of the gust get no save and take 2d20 - AC points of damage.
After this the Navigator fights until defeated or the party retreats. He
does not follow beyond the end of the corridor (the doorway in).
What now?
Well, the if the PCs defeat
the Navigator they have access to the dragon statue, with the gems and
metals embedded in it's back and wings. This they can sell for purely artistic
value (it is very well made) or they can try to research a bit more (it's
worth a lot more to a dwur family or a scholar of Dwur society/history).
The shattered mirror may
have a twin in another waystation, perhaps a reference to the twin dragon
mirrors of the dwur could be dropped in somewhere else.
The Navigator's treasure
is hidden beneath the throne in a compartment sunken into the dais.
Exits: this can be a dead end if the dm wishes but I personally put
in a long (very long) passageway that eventually exited at the back of
a cave on a mountainside in a range nearby. Alternatively the party can
try to manage a boat and try the river or they can try to get back across
the chasm (hint: the oak table would probably be enough to break apart
and turn into a temporary bridge for crossing).